![](https://primary.jwwb.nl/public/h/x/v/temp-uayiyjljzqyranznlthb/7woglt/vamera.png?enable-io=true&enable=upscale&crop=770%2C837%2Cx1%2Cy0%2Csafe&width=102&height=111)
Panasonic DC TZ 95
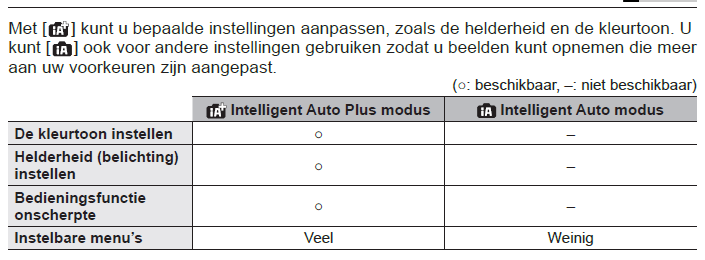
Helderheid (Belichting)/Onscherpte van de achtergrond (onscherpteregelingsfunctie) instellen [Pag.57]
- Opnamemodus:
![](https://primary.jwwb.nl/public/h/x/v/temp-uayiyjljzqyranznlthb/1oa1wf/iaplus2.png?enable-io=true&enable=upscale&crop=225%2C176%2Cx0%2Cy1%2Csafe&width=55&height=43)
- Druk, om het instelscherm weer te geven op :
![](https://primary.jwwb.nl/public/h/x/v/temp-uayiyjljzqyranznlthb/p9cuau/panasonicup.png?enable-io=true&enable=upscale&crop=323%2C284%2Cx2%2Cy0%2Csafe&width=50&height=44)
- Druk op Fn1 om de instelling voor onscherpte te bedienen en daarna opnieuw om de bediening te voltooien.
![](https://primary.jwwb.nl/public/h/x/v/temp-uayiyjljzqyranznlthb/z05vvc/panasonic-fn1.png?enable-io=true&enable=upscale&crop=218%2C90%2Cx0%2Cy1%2Csafe&width=61&height=25)
- Draai de bedieningsknop om in te stellen
![](https://primary.jwwb.nl/public/h/x/v/temp-uayiyjljzqyranznlthb/nfx1o5/canonwiel-2rood.png?enable-io=true&enable=upscale&crop=468%2C401%2Cx2%2Cy0%2Csafe&width=56&height=48)
- Druk op [Menu/Set] om terug te keren naar het opname scherm.
- Instelling annuleren met de knop
![](https://primary.jwwb.nl/public/h/x/v/temp-uayiyjljzqyranznlthb/kipje0/panasonic-terug.png?enable-io=true&enable=upscale&crop=273%2C180%2Cx2%2Cy0%2Csafe&width=50&height=33)
- De automatische scherpstelmodus staat ingesteld op:
![](https://primary.jwwb.nl/public/h/x/v/temp-uayiyjljzqyranznlthb/1bhsfc/panasonicachtergrondonscherpte.png?enable-io=true&enable=upscale&crop=415%2C223%2Cx2%2Cy0%2Csafe&width=52&height=28)
- De plaats van het AF gebied kan worden ingesteld door het scherm aan te raken. (De grootte is niet te wijzigen)
Bij bediening van het aanraakscherm:
- Raak aan het item wat u wilt instellen:
![](https://primary.jwwb.nl/public/h/x/v/temp-uayiyjljzqyranznlthb/1oa1wf/iaplus2.png?enable-io=true&enable=upscale&crop=225%2C177%2Cx0%2Cy0%2Csafe&width=79&height=62)
- Kleur
![](https://primary.jwwb.nl/public/h/x/v/temp-uayiyjljzqyranznlthb/8djj4h/panasonic-4.png?enable-io=true&enable=upscale&crop=364%2C195%2Cx1%2Cy0%2Csafe&width=95&height=51)
- Mate van onscherpte
![](https://primary.jwwb.nl/public/h/x/v/temp-uayiyjljzqyranznlthb/heygmf/panasoninc12.png?enable-io=true&enable=upscale&crop=426%2C251%2Cx0%2Cy1%2Csafe&width=102&height=60)
- Helderheid
![](https://primary.jwwb.nl/public/h/x/v/temp-uayiyjljzqyranznlthb/lmnh7w/panasonic-i3.png?enable-io=true&enable=upscale&crop=434%2C240%2Cx1%2Cy0%2Csafe&width=103&height=57)
- Druk op Menu/Set om terug te gaan naar het opnamescherm.
Opname
Scherpstelbereik: [Pag.36]
- Druk de knop half in om scherp te stellen op het onderwerp
- Als diafragma en sluitertijd rood zijn is niet goed ingesteld (Behalve bij flits)
- Het scherpstelbereik wordt getoond als zoom wordt gebruikt.
Foto met automatische sluitertijd en diafragma: [Pag.66]
- Opnamemodus P
![](https://primary.jwwb.nl/public/h/x/v/temp-uayiyjljzqyranznlthb/c5gdle/panasonic-modusknop.png?enable-io=true&enable=upscale&crop=360%2C439%2Cx0%2Cy0%2Csafe&width=50&height=61)
- Links onder in scherm worden waarden aangegeven. Als ze rood knipperen is de waarde niet goed ingesteld.
Autofocus [Pag.54]
- Staat automatisch ingesteld op gezichtsherkenning
- Raak het onderwerp aan om over te schakelen naar naar :
![](https://primary.jwwb.nl/public/h/x/v/temp-uayiyjljzqyranznlthb/bbaxk8/panasonicaf2.png?enable-io=true&enable=upscale&crop=383%2C203%2Cx1%2Cy0%2Csafe&width=81&height=43)
Als 'Gezicht herk.' is ingesteld op ON en als de camera her gezicht herkent word R in de rechterbovenhoek van de pictogrammen weergegeven
![](https://primary.jwwb.nl/public/h/x/v/temp-uayiyjljzqyranznlthb/aw8dox/panasonicgezichtsherkenning01.png?enable-io=true&enable=upscale&crop=322%2C164%2Cx1%2Cy0%2Csafe&width=98&height=50)
![](https://primary.jwwb.nl/public/h/x/v/temp-uayiyjljzqyranznlthb/xw53sz/panasonicgezichtsherkenning02.png?enable-io=true&enable=upscale&crop=328%2C168%2Cx0%2Cy0%2Csafe&width=96&height=49)
![](https://primary.jwwb.nl/public/h/x/v/temp-uayiyjljzqyranznlthb/8p02fo/panasonicgezichtsherkenning03.png?enable-io=true&enable=upscale&crop=322%2C161%2Cx1%2Cy0%2Csafe&width=100&height=50)
Werkt alleen als automatische scherpstelmodus is ingesteld op:
![](https://primary.jwwb.nl/public/h/x/v/temp-uayiyjljzqyranznlthb/irjjbg/panasonicgezichtsherkenning04.png?enable-io=true&enable=upscale&crop=280%2C165%2Cx1%2Cy0%2Csafe&width=78&height=46)
Zie ook Pag.215 Gez.herk.bew.
Zie ook Pag.197 Gezichtsfoto's registreren (max.6)
Beelden opnemen met de aanraakfunctie [Pag.43/104]
- Raak het scherm aan
![](https://primary.jwwb.nl/public/h/x/v/temp-uayiyjljzqyranznlthb/mlfs8n/panasonic-scherm-01.png?enable-io=true&enable=upscale&crop=328%2C241%2Cx0%2Cy2%2Csafe&width=49&height=36)
- Kies Pictogram:
- AF Aanraakfunctie - Er wordt scherp gesteld op de plaats die je aanraakt
- Aanraaksluiter - Er wordt scherp gesteld op de aangeraakte positie voordat de opname plaatsvind.
- Uit
Als [Touch AF] in het menu [Touch inst.] van het menu [voorkeuze] [Bediening] is ingesteld op [AF+AE] worden de scherpstelling en de helderheid geoptimaliseerd voor de aangeraakte positie.
Fotos maken met automatische instellingen [Pag.53]
(Intelligent Automodus)
- Zet de modusknop op
![](https://primary.jwwb.nl/public/h/x/v/temp-uayiyjljzqyranznlthb/c5gdle/panasonic-modusknop.png?enable-io=true&enable=upscale&crop=359%2C439%2Cx1%2Cy0%2Csafe&width=62&height=76)
- Richt de camera op het onderwerp .. automatische scene detectie toont dan de herkende scene
- Schakelen tussen de Intelligente Auto Pkus modus en de Auto modus:
Menu: iA/iA+
![](https://primary.jwwb.nl/public/h/x/v/temp-uayiyjljzqyranznlthb/tpdwyb/path994-2.png?enable-io=true&enable=upscale&crop=161%2C154%2Cx0%2Cy0%2Csafe&width=50&height=48)
Je kan ook op het pictogram op het opnamescherm klikken.
Automatische scherpstelmodus,Gezicht/ogen detecteren en gezichtsherkenninh [Pag.54]
![](https://primary.jwwb.nl/public/h/x/v/temp-uayiyjljzqyranznlthb/9owz5c/pasted-imagesatnov052022203323gmt0100midden-europesestandaardtijd.png?enable-io=true&enable=upscale&crop=712%2C193%2Cx0%2Cy0%2Csafe&width=557&height=151)
Kleur instellen [Pag.56]
- Opnamemodus iA
![](https://primary.jwwb.nl/public/h/x/v/temp-uayiyjljzqyranznlthb/1oa1wf/iaplus2.png?enable-io=true&enable=upscale&crop=225%2C176%2Cx0%2Cy1%2Csafe&width=55&height=43)
- Druk op de
![](https://primary.jwwb.nl/public/h/x/v/temp-uayiyjljzqyranznlthb/syk1ku/mdbloem.png?enable-io=true&enable=upscale&crop=173%2C150%2Cx0%2Cy0%2Csafe&width=65&height=56)
![](https://primary.jwwb.nl/public/h/x/v/temp-uayiyjljzqyranznlthb/4aizi1/panasonicleft.png?enable-io=true&enable=upscale&crop=284%2C325%2Cx0%2Cy1%2Csafe&width=56&height=64)
om het instelscherm weer te geven
- Draai de bedieningsknop om de kleur aan te passen
- Druk op Menu/Set om terug te keren naar het opname scherm.
![](https://primary.jwwb.nl/public/h/x/v/temp-uayiyjljzqyranznlthb/nfx1o5/canonwiel-2rood.png?enable-io=true&enable=upscale&crop=471%2C401%2Cx1%2Cy0%2Csafe&width=61&height=52)
Programme shift [Pag.66]
De functie voor het behouden van dezelfde belichting (helderheid) terwijl u de combinatie van diafragmawaarde en sluitertijd verandert, heet "Programme Shift" . Hiermee kunt u beelden opnemen door de diafragmawaarde en sluitertijd aan te passen, zelfs in de Programma AE-modus.
- Stel Flitser in op uit.
- Druk de ontspanknop half in en geef de tijden in het scherm weer (ong.10 sec.)
- Wijzig de waarden met de Bedieningsknop.
(Werkt niet als flitser staat ingesteld)
A= Sluitertijd, B = Diafragma
![](https://primary.jwwb.nl/public/h/x/v/temp-uayiyjljzqyranznlthb/nfx1o5/canonwiel-2rood.png?enable-io=true&enable=upscale&crop=471%2C401%2Cx1%2Cy0%2Csafe&width=61&height=52)
Foto maken door de diafragma waarde in te stellen (Lensopening-Prioriteit AE-modus): [Pag.68]
Wanneer u de diafragmawaarde instelt, wordt de sluitertijd automatisch geoptimaliseerd voor de helderheid van het onderwerp.
- Stel de modusknop in op A:
![](https://primary.jwwb.nl/public/h/x/v/temp-uayiyjljzqyranznlthb/dmgwcf/panasonic-modusknop-2.png?enable-io=true&enable=upscale&crop=360%2C439%2Cx0%2Cy0%2Csafe&width=50&height=61)
- Draai de bedieningsknop om de diafragmawaarde in te stellen.
![](https://primary.jwwb.nl/public/h/x/v/temp-uayiyjljzqyranznlthb/j2cgzh/panasonic-bedieningsknop.png?enable-io=true&enable=upscale&crop=484%2C326%2Cx0%2Cy1%2Csafe&width=52&height=35)
A = Diafragmawaarde, B = Belichtingsmeter